Installation requirements:
- CentOS/RHEL/Fedora/Debian/Ubuntu/Raspbian/Deepin/Aliyun/Amazon/Mint Linux distributions are supported.
- At least 5GB of available space is required. For MySQL 5.7 and MariaDB 10, at least 9GB of free space is required.
- For the latest version of MySQL 8.0, at least 25GB of free space is required. If there is not enough space and the architecture is x86 or x86_64, you can choose to install Generic Binaries for MySQL.
- At least 128MB of memory is required (128MB for small memory VPS, Xen requires SWAP, OpenVZ requires at least 128MB of vSWAP or burst memory). Note: do not use a 64-bit system for small memory!
- To install MySQL 5.6 or 5.7 and MariaDB 10, at least 1GB of memory is required, while higher versions require at least 2GB of memory!
- To install PHP 7 or later, at least 1GB of memory is required!
- VPS or server must have properly set up yum or apt-get sources and be able to function properly. For offline installation, add the CheckMirror=n parameter!
- Do not install old PHP/MySQL versions on very new Linux distributions, or very new PHP/MySQL versions on old Linux distributions.
- Linux is case sensitive, so be careful when entering commands!
- If MySQL/MariaDB is installed via yum or apt-get, please backup data and related files on your own!
- CentOS 5, 6, 8, Debian 6, 7, 8, or lower versions are no longer supported and cannot be directly used. You need to replace the vault or archive sources on your own!
- For CentOS 6 and 8, please use lnmp 1.9+ for installation!
- Ubuntu 18+, Debian 9+, Mint 19+, Deepin 15.7+, and all newer Linux distributions can only be installed using 1.7+!
- PHP versions below 7.1.* do not support very new Linux distributions such as Ubuntu 19+ and Debian 10+!
- Aliyun’s Ubuntu 14.04 and 22.04 system templates have problems and should not be used! If you need to use them, please look for solutions in the forum.
- To upgrade or install PHP 7.4, CentOS 7+, Debian 8+, Ubuntu 16.04+, and lnmp 1.7+ must be used!
- To upgrade or install MySQL 8.0.23 or earlier versions, CentOS 8+, Debian 9+, Ubuntu 16.04+, and lnmp 1.7+ must be used!
- To upgrade or install MySQL 8.0.24 or later versions, Debian 11+, Ubuntu 20.04+, Fedora 33+, CentOS 9, and gcc 10+ are required, and lnmp 1.9+ must be used. If the requirements are not met, please choose the (Generic Binaries) binary installation method!
- To upgrade or install MariaDB 10.* or later versions, CentOS 8+, Debian 10+, Ubuntu 18.04+ or systems with cmake version higher than 3 are required, or cmake must be upgraded on your own! If the requirements are not met, choose the (Generic Binaries) binary installation method using lnmp 2.0.
Installation Steps:
1. Log in to the VPS or server using SSH tool such as Putty.
After logging in, run: screen -S lnmp
If prompted with “screen: command not found,” execute: yum install screen or apt-get install screen to install it. For more details, refer to the screen tutorial.
2. Download and install the LNMP one-click installation package:
You can choose to use the download version (recommended for users with VPS or small storage space in the United States or overseas) or the full version (recommended for users with VPS in China. Chinese users can find domestic download addresses in the download). There is no difference between the two versions, except that the full version contains some required source code files pre-installed in the package.
To install the stable version of LNMP:
If you need an unattended installation, please use the unattended command generation tool, or refer to the unattended installation tutorial.
wget http://soft.vpser.net/lnmp/lnmp1.9.tar.gz -cO lnmp1.9.tar.gz && tar zxf lnmp1.9.tar.gz && cd lnmp1.9 && ./install.sh lnmp
To install LNMPA or LAMP, replace the parameter lnmp after ./install.sh with lnmpa or lamp, respectively. It also supports separate installation of Nginx or database, the command is ./install.sh nginx or ./install.sh db.
To change website and database directories, customize Nginx parameters, install PHP parameter modules, enable lua, etc., modify the lnmp.conf file under the installation package directory before running the ./install.sh command. For details, please refer to the lnmp.conf file parameter instructions.
If prompted with “wget: command not found,” use the yum install wget or apt-get install wget command to install it.
If the download speed is slow or unable to download, please change to other download nodes. For specific replacement methods, please refer to the LNMP download node.
After running the above LNMP installation command, the following prompt will appear:
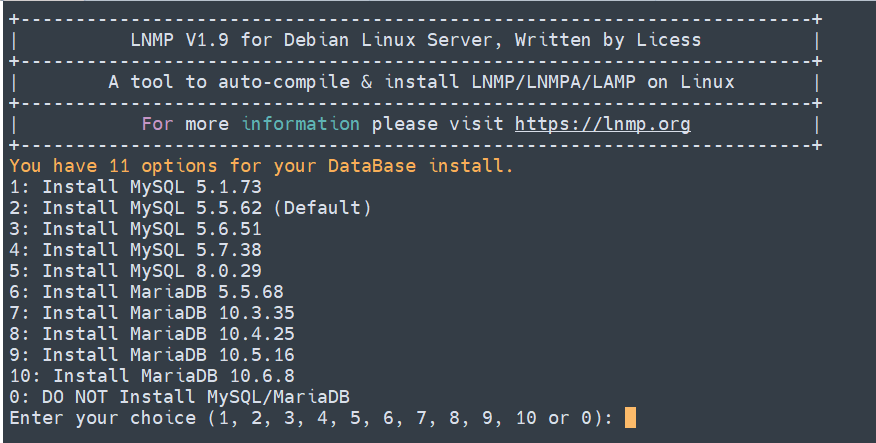
Currently, there are many versions of MySQL and MariaDB available, as well as an option not to install a database. Please note that MySQL 5.6, 5.7, and MariaDB 10 can only be selected on higher configurations with 1GB or more of memory! If you only need to install the database, execute “./install.sh db” in the lnmp installation package directory.
Enter the number in front of the corresponding MySQL or MariaDB version and press Enter to proceed to the next step.
If you choose MySQL 5.7 or 8.0 and are using x86 or x86_64 architecture, you will be prompted with “Using Generic Binaries [y/n]:”. This step prompts whether to use binary installation. Enter “y” to use binary installation or “n” to use source code compilation installation.
Due to the large size of the MySQL 5.7/8.0 binary package, please use the compilation installation method or download the corresponding version binary package yourself and place it in the installation package src directory for offline installation.

Set the root password for MySQL (if you press Enter without entering a password, it will be set as lnmp.org# followed by random numbers for security). To delete any errors in your input, press Ctrl and then Backspace (in some cases, simply Backspace is sufficient). Once you have entered the password, press Enter to proceed to the next step, as shown in the figure below.

Asking whether to enable MySQL InnoDB engine, which is enabled by default. It is generally recommended to enable it. Press Enter or input “y”. If you are sure you don’t need this engine, input “n”. (InnoDB cannot be disabled in MySQL 5.7+.) After inputting, press Enter to proceed to the next step.
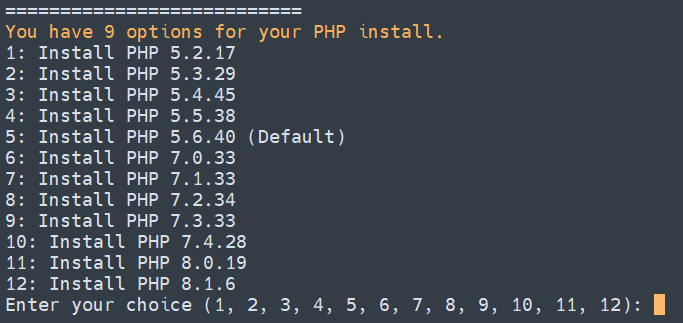
Note: When selecting PHP 7+ version, you need to confirm on your own if the PHP version is compatible with your program.
Enter the corresponding number for the PHP version you want to select, and press Enter to proceed to the next step. Then select whether to install memory optimization:

You can choose not to install, or to install Jemalloc or TCmalloc. Enter the corresponding number and press Enter. Pressing Enter directly will select the default option of not installing.
After the prompt “Press any key to install…or Press Ctrl+c to cancel”, press enter to confirm the start of the installation. The LNMP script will automatically install and compile software such as Nginx, MySQL, PHP, phpMyAdmin, and related components.
The installation time may vary from several tens of minutes to several hours, mainly depending on the machine’s configuration and network speed.
3. Installation completed
If it displays “Nginx: OK”, “MySQL: OK”, “PHP: OK”,…
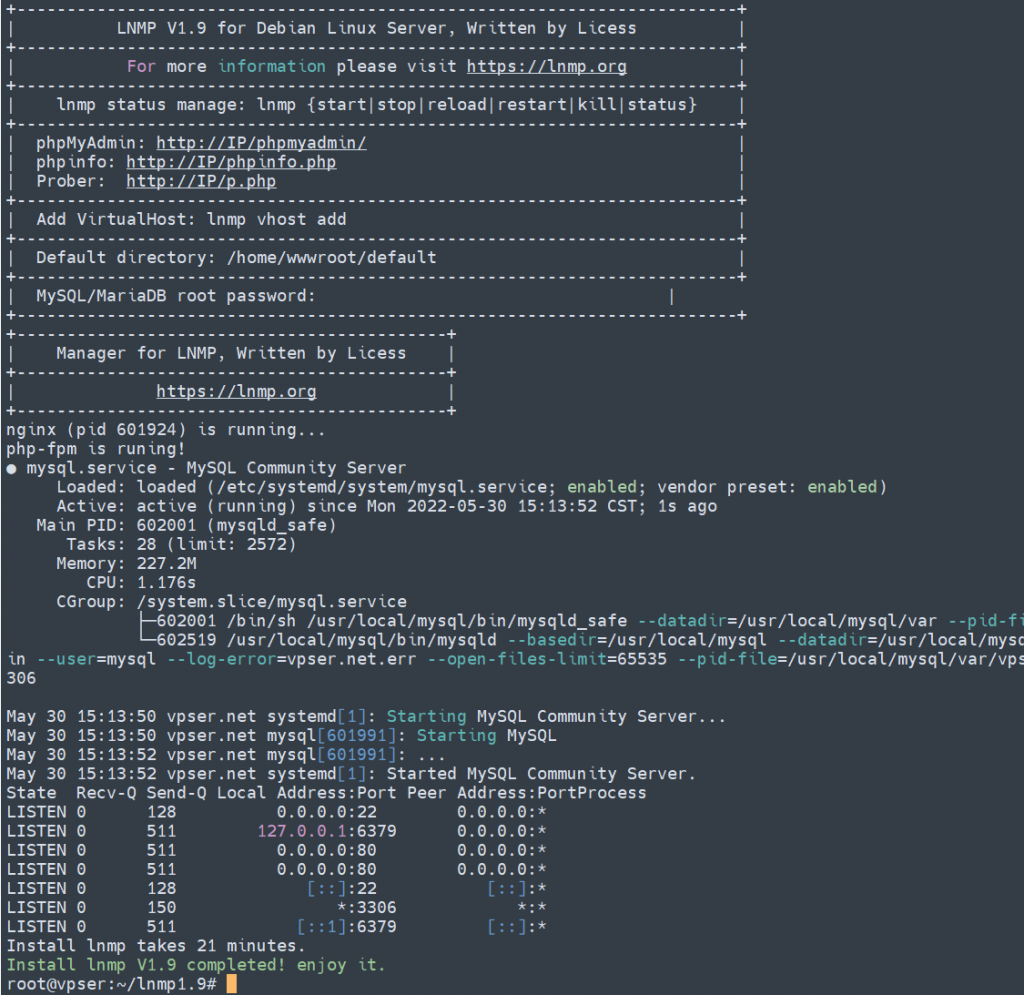
If Nginx, MySQL, and PHP are all running, ports 80 and 3306 are open, and it shows the time used for installation and the message “Install lnmp V1.9 completed! enjoy it.”, it means that the installation was successful.
In some systems, it may remain at “Install lnmp V1.9 completed! enjoy it.” and not exit automatically. You can press Ctrl+c to exit.
After installation, you can start using it. Follow the instructions to add a virtual host, upload your website code using SFTP or FTP server, and point your domain name to the IP address of your VPS or server. Once the DNS resolution takes effect, you can start using it.
4. Add and delete virtual hosts and pseudo-static management:
https://lnmp.org/faq/lnmp-vhost-add-howto.html
5. Installation of eAccelerator, xcache, memcached, imageMagick, ionCube, redis, opcache:
https://lnmp.org/faq/addons.html
6. LNMP related software directory and file location:
https://lnmp.org/faq/lnmp-software-list.html
7. LNMP status management command:
https://lnmp.org/faq/lnmp-status-manager.html
8. Install only database or Nginx
Starting from lnmp 1.5, MySQL/MariaDB database or Nginx can be installed separately.
To install Nginx alone, run: ./install.sh nginx under the installation package directory;
To install the database alone, run: ./install.sh db under the installation package directory.
9. The lnmp one-click installation package supports installation in completely offline mode.
Note: Offline installation does not mean that no source is needed, but it requires you to build a source for installation locally.
CentOS system offline installation tutorial: https://www.vpser.net/manage/centos-iso-local-yum-repository.html
There is no iso available under Debian/Ubuntu distribution, you need to use the apt-get install -d command to download all necessary packages in a completely identical temporary environment, and then use the dpkg-scanpackages command to package the required software packages into a source directory. Package this directory and put it on the target server and set it as the source.
Note: If MySQL/MariaDB chooses “Generic Binaries” for installation, you must download the specified binary package by yourself and upload it to the lnmp installation package src directory.
10. Uninstall the lnmp one-click installation package
Execute: ./uninstall.sh under the lnmp installation package directory, select the current environment type as prompted, and press Enter to confirm. The lnmp related program components will be deleted, the website files will be retained, and the database directory will be backed up separately to the /root directory. Please backup any other files that need to be saved before uninstalling.